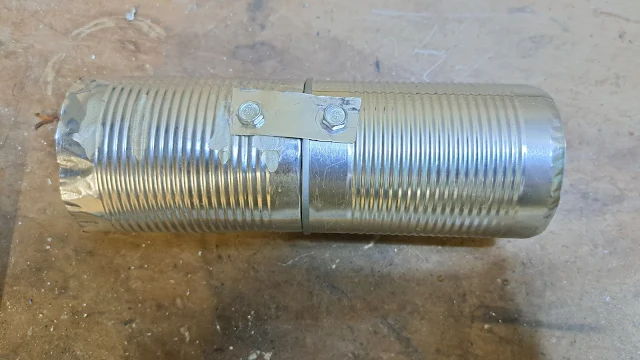
Using an augmenter on a pulsejet can significantly enhance the performance and efficiency of the engine. The augmenter works by drawing additional air into the exhaust stream, which increases thrust without requiring more fuel.
The high speed exhaust creates an area of low pressure behind the exhaust. The augmenter takes advantage of this by allowing air to be sucked into the low pressure area. The augmenter then directs this air backwards along with the exhaust. In theory, this can add 40% more power with the same fuel consumption. It also has an added benefit of supposedly making the engine quieter from certain positions. The effect that creates an area of low pressure is known as Bernoulli's principle.
This is especially beneficial for applications where maximizing power output while maintaining fuel efficiency is crucial. Additionally, the increased airflow helps cool the engine, reducing wear and prolonging its lifespan. The result is a more robust and reliable engine that can perform better under a wider range of conditions, making it an attractive option for me in my quest to squeeze as much power as possible out of this tin can pulsejet.
This was the original plan for the augmenter. It would be a tube connected with a metal wire to the exhaust pipe of the pulsejet. A metal tube of this size would be expensive and hard to find and work with, so I settled with two more soup cans. They would be held together with screws, and connected to the engine with a 8mm pipe, the same I used as a fuel injector.
Firstly, I started with two soup cans with the bottoms cut off. One of the cans fits perfectly in the other can's lip, and forms a seal when pressed together.
Then place the tins on top of each other:Next, I use an aerosol can as a source of sheet metal. This is how to prepare it:
First, I cut the bottom off the can, by smacking a hole into the can with a screwdriver, and then pulling the metal off in a ring around the can with the pliers. Do this with both sides to end up with a thin, metal cylinder without ends.
Next, cut a slit right down the whole cylinder:
This leaves a thin sheet of metal that you can easily cut with scissors, and can withstand high heat.
Next, I cut out two identical strips of metal to hold the cans together. The one of the left has been flattened by repeatedly tapping it with a hammer, and the one of the right hasn't. It is important to make sure the metal is straight.
Next, I drilled two holes into the metal, and inserted two bolts through the holes.I drilled a hole in the can, and bolted the strip of metal to it. Do this on both sides opposite eachother.
Next, I placed the other can on top and marked out the holes
These holes were then drilled out, and the bolts were fitted through them and tightened to make a secure, robust, high temperature, air-tight seal.
Now we have to connect the augmenter to the pulsejet. I want the augmenter to be able to flex and not be firmly connected to the engine, since the vibrations from the engine could easily cause the nuts to vibrate off the bolts. To fix this, I connected it with a thin piece of bendable metal , so that the augmenter is secure, but the metal absorbs the majority of the vibrations.
I took the same tube as I used for the fuel rail and flattened the end. Then i drill=-1


